We are happy to announce that support for FujiNet-PC Atari is available in the atari800 emulator source code. FujiNet-PC for the Altirra Atari 8-Bit emulator has been available for quite some time but it is natively a Windows only program. While Altirra can run on Linux and Mac under Wine, atari800 can be built to run natively on these platforms.
Until a new version of atari800 is released, you can build their latest source code to get NetSIO support which interfaces with FujiNet-PC. FujiNet-PC builds for Linux and Mac are available on the releases page or you can build it from source also.
NetSIO is a protocol created by FujiNet developer apc that acts as a middle-man or bridge between the emulator and FujiNet-PC. Since FujiNet began as a real hardware device for Atari, it conforms to the SIO specifications and makes use of all the hardware pins on the SIO port and these pins must also be emulated for FujiNet to work correctly. NetSIO forms data packets that are passed to FujiNet-PC via UDP.
NetSIO should be enabled at build time automatically for Linux and Mac builds of atari800 or you can optionally specify –enable-netsio when running the configure script before building it. Note, atari800 NetSIO will only work with Linux or MacOS and not for Windows. Once you have atari800 built, run FujiNet-PC first then just add -netsio to your atari800 command line options to enable it. It will automatically connect to FujiNet-PC and boot the usual CONFIG program.
This opens the door for FujiNet-PC to run on any device running Linux including low power ARM devices. Some of us on the dev team have been working to get it running on the Miyoo Mini Plus handheld emulator which has wifi built-in. This means it is possible to have a FujiNet on the go!
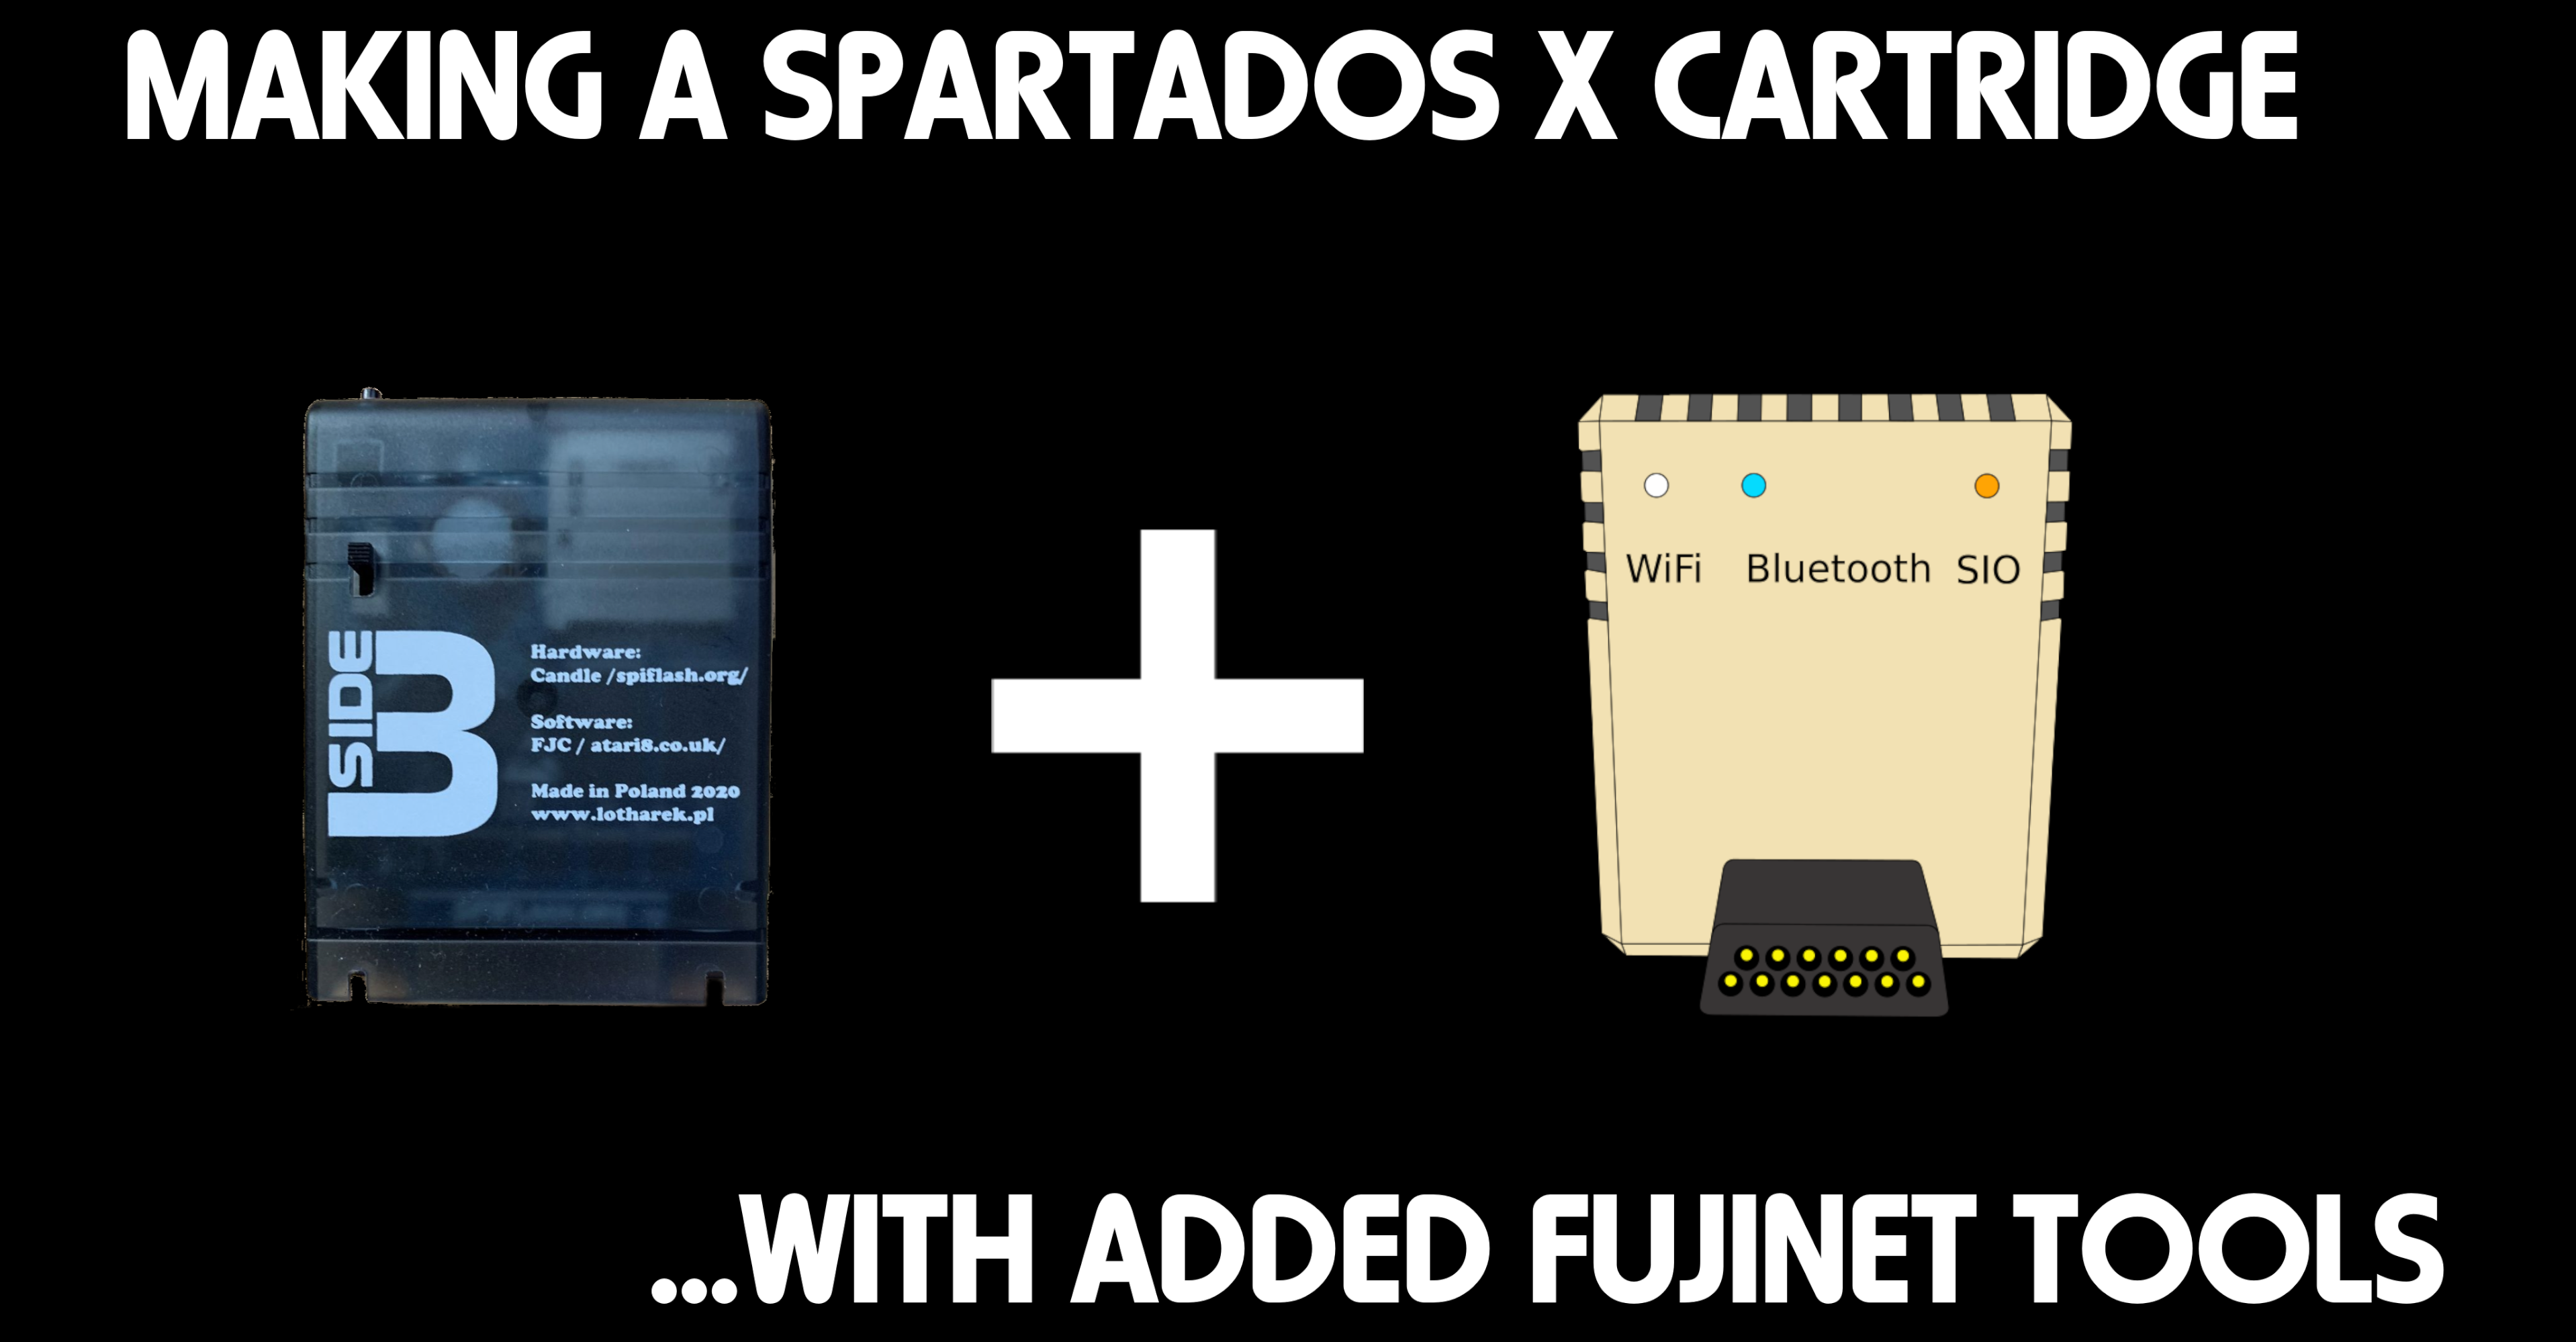
The following YouTube video shows how to create your own SpartaDOS X cartridge with the FujiNet tools, from scratch, using the SpartaDOS X Imager (SDXImager) tool.
For this video, I installed a fresh copy of Ubuntu Linux Desktop using default options, and added the following packages via a terminal:
sudo apt install build-essential git wine
Once everything is built, you can transfer it to the nearest FujiNet via WebDAV, by selecting Network in Files, and Connecting to the address of your FujiNet:
FujiNet is more than hardware. I see it as a way to bring people together via a WiFi network adapter. The FujiNet community not only do this by providing ways for people to load software, and make new networkable programs that we all can use, but we provide ways to do things together like competing for high scores in games.
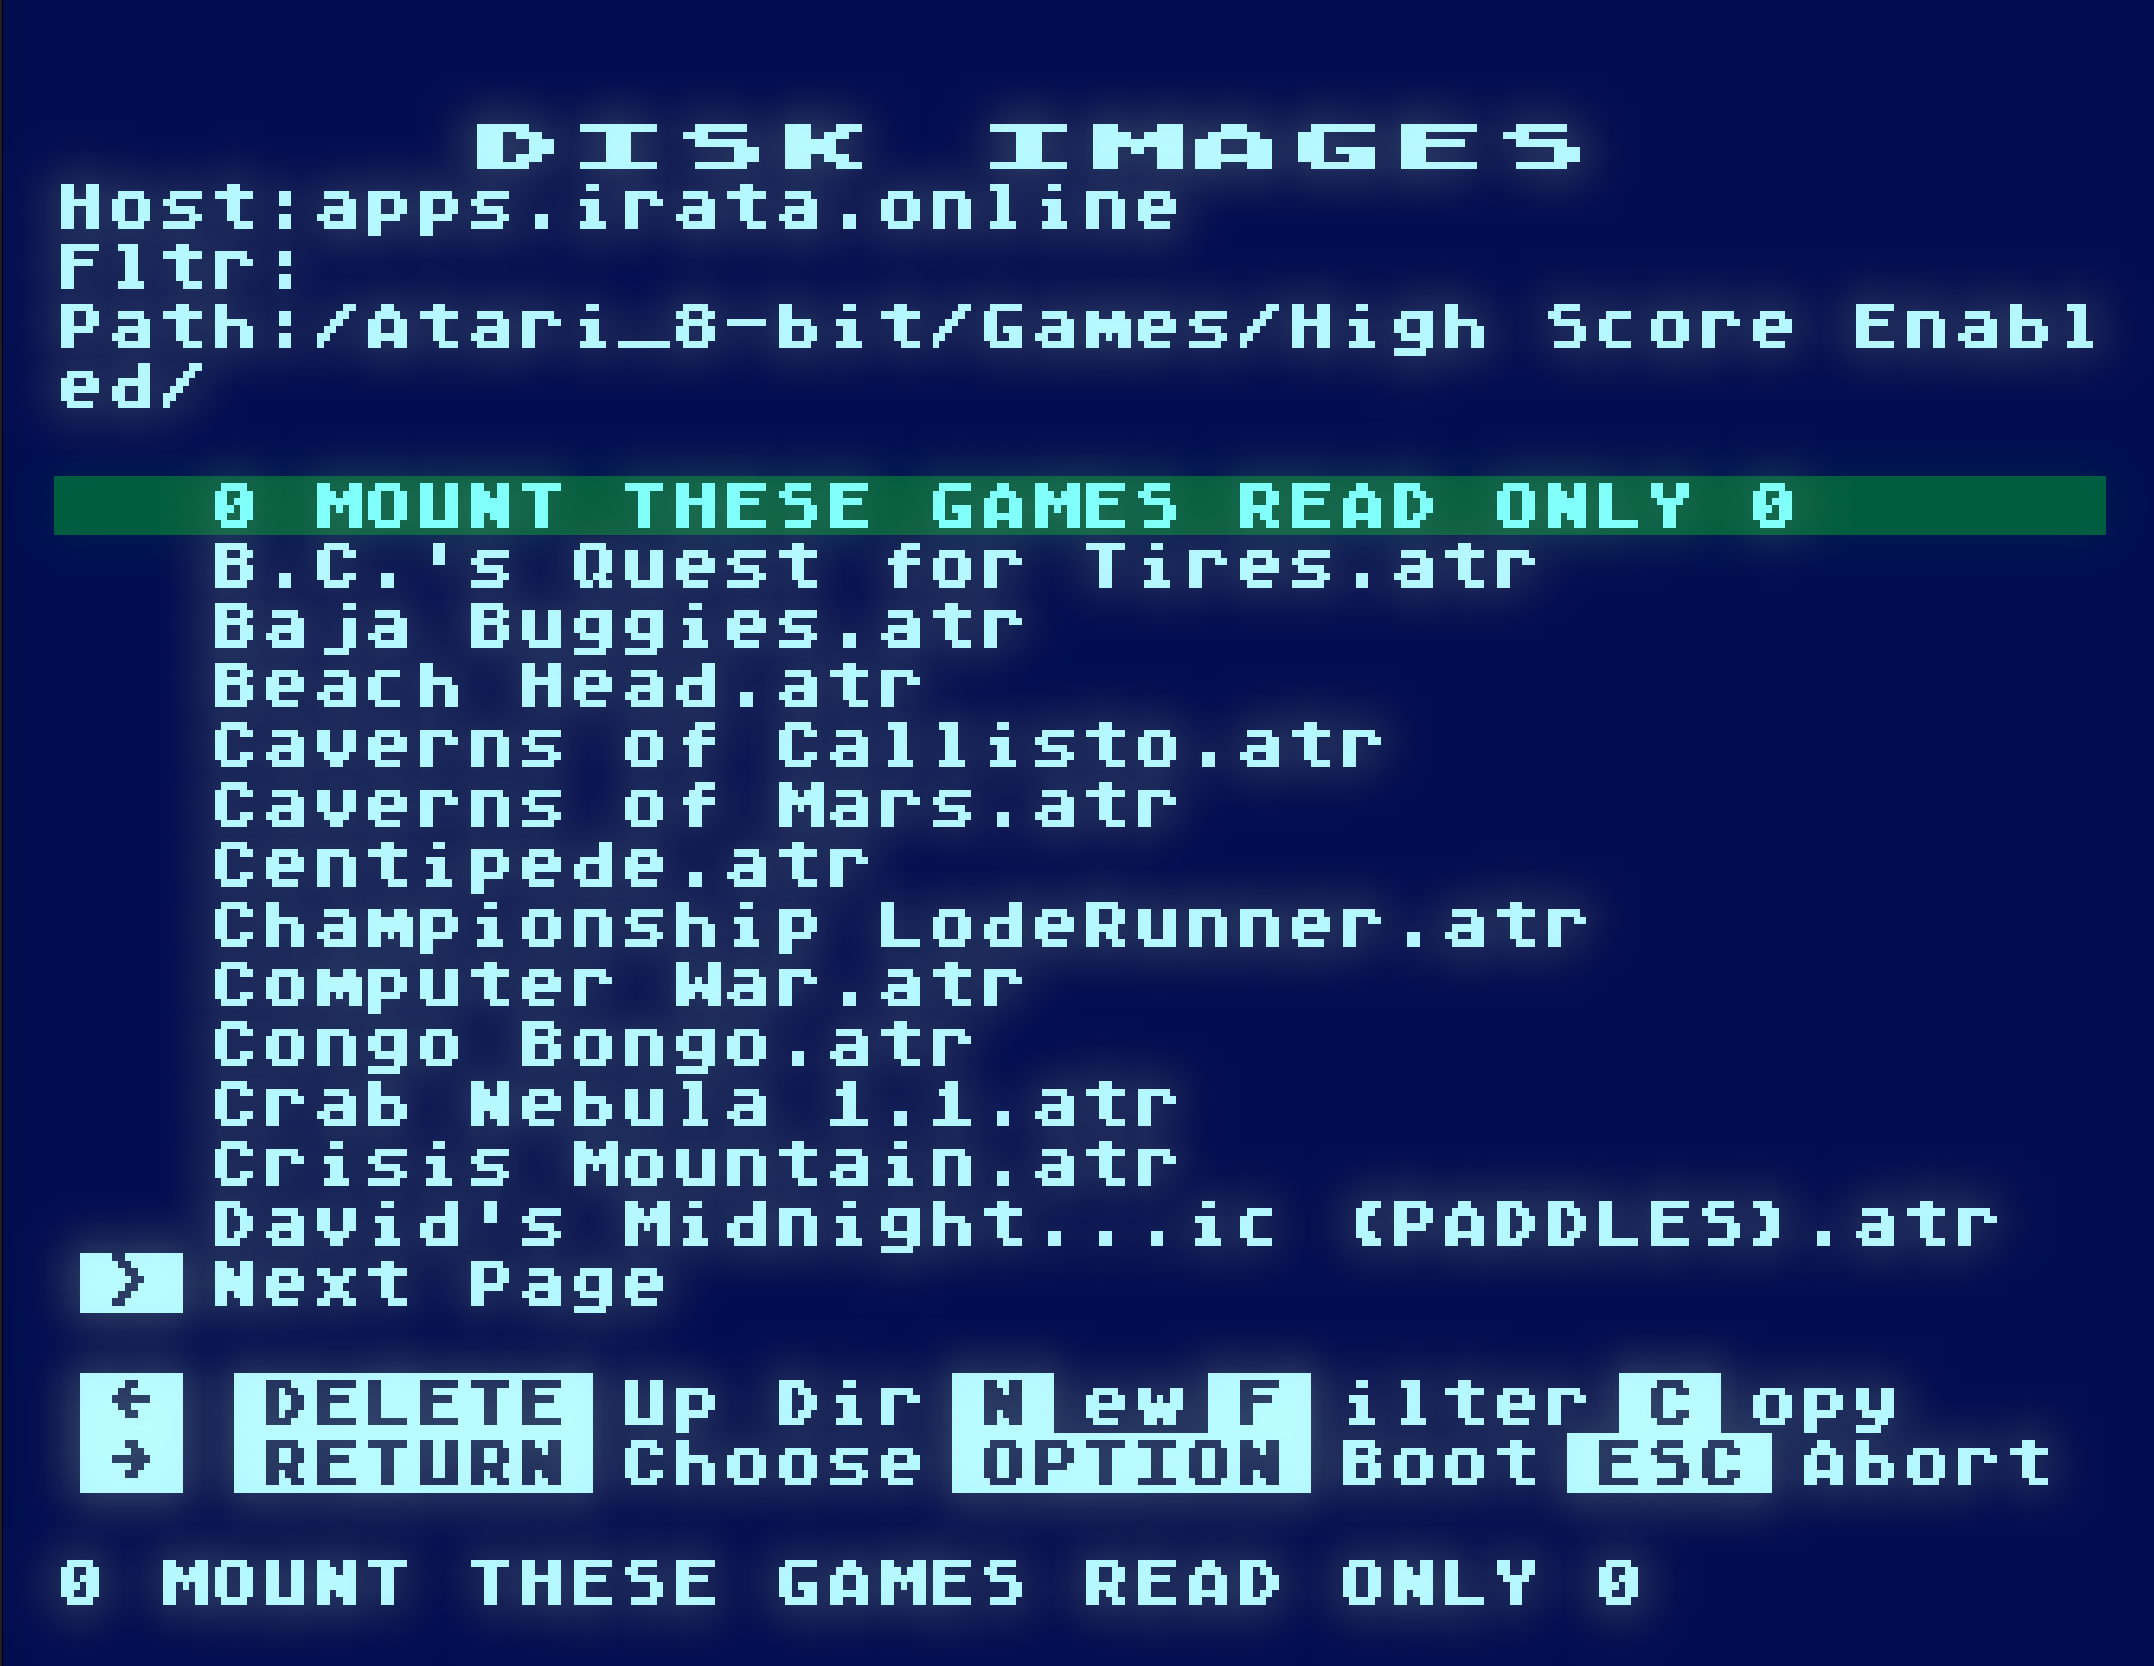
To this end, FujiNet implements a feature called “High Score Enabled” which is a simple way to allow for games to specify where on a disk their high score tables are stored, and to allow for those areas to be written to, even with the game being mounted as read only. When a game marked as High Score Enabled, any writes to the high score sectors cause the FujiNet to temporarily re-mount the disk as read-write, write the resulting sectors, and then close the temporary write, re-mounting again as read-only. The apps.irata.online TNFS server contains a growing number of games which have been adapted to work in this manner.
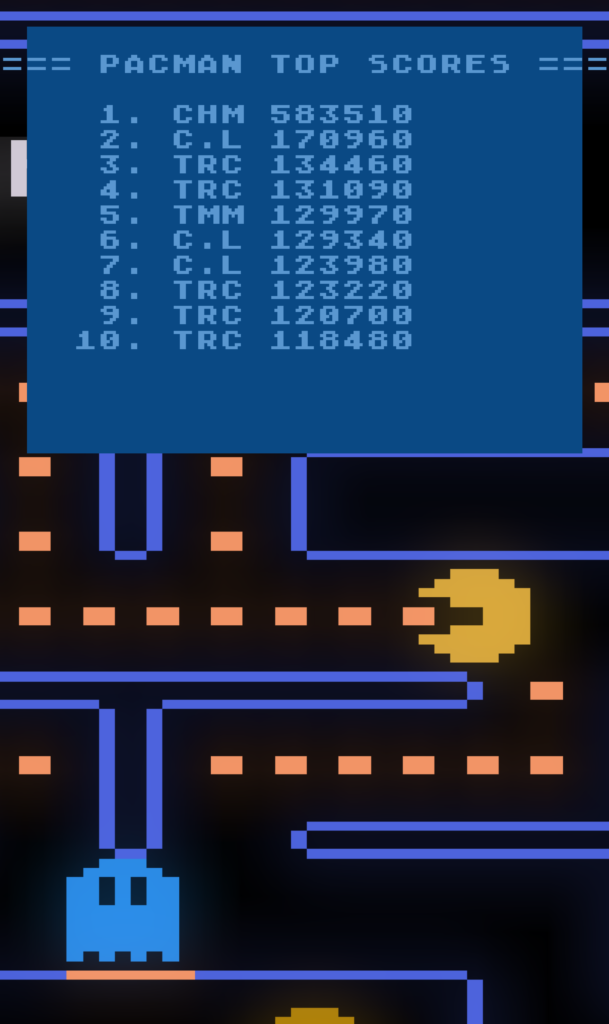
In addition to allowing the read-write of high score tables in these specially marked disk images, there are web pages which get automatically updated with small “scraper” programs, running on the same server and disk as the high-score enabled disk image, which detect the changes in the ATR disk image, and generate a new web page for public viewing, you can see the scores from apps.irata.online‘s High Score Enabled games via scores.irata.online.
How can I make my game High Score Enabled?
Making your game High Score Enabled can be as simple as:
Store your high scores on the disk image.
Alter the ATR header to mark the sectors occupied by high score as writable.
Implement a scraper if you want to make a web page (optional).
Storing High Scores
This is entirely up to you, as to how you implement it, FujiNet does not care. In the four dozen games that I’ve ported thus far, I have put their implementation in three categories:
Games that already have a high score table, and save them to disk. Not much to do here but to find where the high score table is, and mark it in the ATR header. Examples of this are Jumpman, Gorf, and Spelunker.
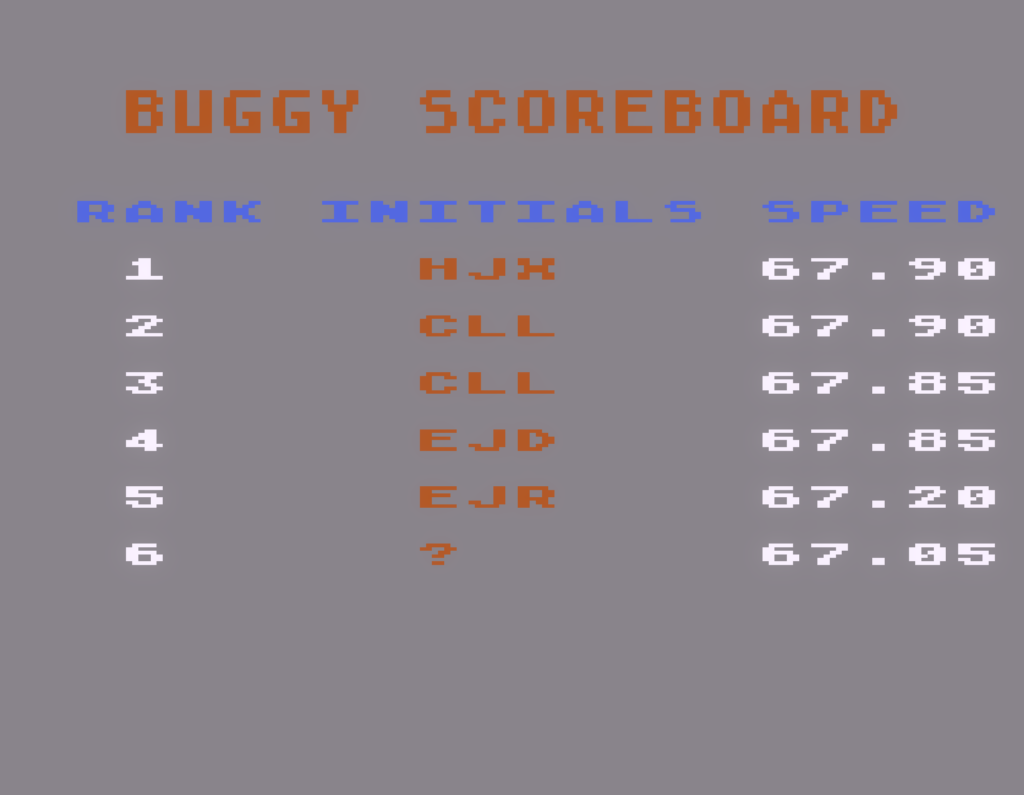
Games that have a High Score table, but do not save it to disk. We just needed to add routines to write the high score to a disk sector, and to read it back again. An example of this is Baja Buggies.
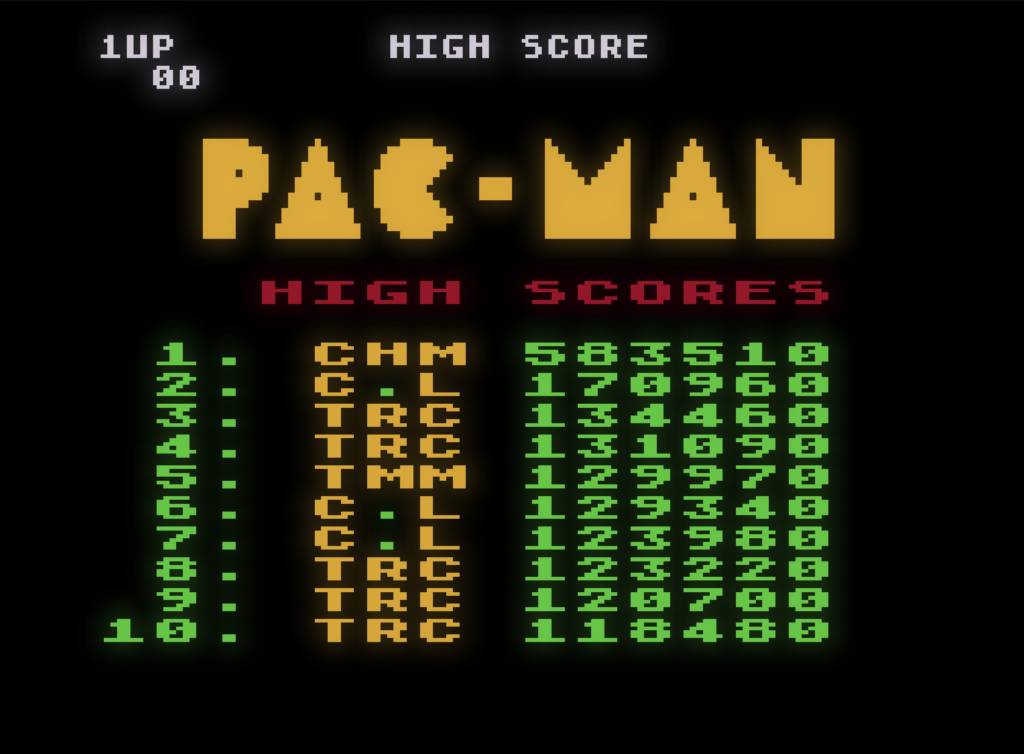
Games that do not have a high score table at all. Examples of this are PAC-MAN, Defender, Dig-Dug, and Pengo.
Altering the ATR Header
The initial 16-byte ATR header has a few unused bytes which we are using to hold the High Score Enabled information. They are very simple:
Offset
Size
Description
+12
1
The number of sectors of the high score table.
+13
2
The starting sector number (0-65535) of the high score table.
The changed bytes of the ATR header to add High Score Enabled data.
In fact, the following C program can easily adapt any ATR file:
Baja Buggies already had a functional high score routine, but it did not write it to disk. The solution to this was to patch Baja Buggies to add two routines to read the high score sectors to and from disk.
The most straightforward way to do this, is to find the location where the high scores are being displayed from main memory, and to use the operating system SIOV routines to write them to disk. Dumping the display list of the high score screen using Altirra, we see the following:
We see the High Score data starting rather cleanly at $3780, and continuing on a bit past $3880. This means that we need three 128 byte sectors to hold the high score data.
But where do we store it?
Tracing how Baja Buggies loads, we can see that the high score data gets loaded in as part of the boot process:
Altirra> .tracesio on
SIO call tracing is now on.
...
SIO: Device $31[1], command $52, buffer $3780, length $0080, aux $0088 timeout  7.5s | Disk: Read sector
SIO: Device $31[1], command $52, buffer $3800, length $0080, aux $0089 timeout  7.5s | Disk: Read sector
SIO: Device $31[1], command $52, buffer $3880, length $0080, aux $008A timeout  7.5s | Disk: Read sector
...
Tracing the read, we see that the three areas in memory that are occupied by the high score are on sectors $88, $89, and $8A. We just need to write a set of routines which can read and write those sectors, and patch them into the game ATR.
As it turns out, there is some space below the scratch area that Baja Buggies uses at $0489 which is large enough to hold a read and write routine. The following bit of assembler is all that is needed to read and write the high scores to and from disk:
;;
;; Write high scores to disk
;;

	OPT h-

DDEVIC	=	$0300	;peripheral bus ID number
DUNIT	=	$0301	;unit number
DCOMND	=	$0302	;bus command ordinal
DSTATS	=	$0303	;command type/status return
DBUFLO	=	$0304	;data buffer pointer
DBUFHI	=	$0305
DTIMLO	=	$0306	;device timeout in seconds
DBYTLO	=	$0308	;number of bytes transferred
DBYTHI	=	$0309
DAUX1	=	$030A	;command auxiliary bytes
DAUX2	=	$030B

SIOV	=	$E459   ; SIO Vector

	ORG $0489

	LDA #$00		; We need to put the bottom of the display back to blank
	STA $37D2		; because we are writing it back to disk.
	STA $37D3		; otherwise all hell breaks loose.

	LDA #$31		; Drive 1
	STA DDEVIC
	LDA #$01		; Unit 1 (D1:)
	STA DUNIT
	LDA #'W'		; Write
	STA DCOMND
	LDA #$80		; ->Drive
	STA DSTATS
	LDA #$80		; $3780
	STA DBUFLO
	LDA #$37
	STA DBUFHI
	LDA #$80		; 128 bytes
	STA DBYTLO
	LDA #$00
	STA DBYTHI
	LDA #$88		; Sector $88
	STA DAUX1
	LDA #$00
	JSR SIOV		; Do it

	LDA #$80
	STA DSTATS
	LDA #$00		; $3800
	STA DBUFLO
	LDA #$38
	STA DBUFHI
	LDA #$89		; Sector $89
	STA DAUX1
	JSR SIOV		; do it

	LDA #$80
	STA DSTATS
	LDA #$80		; $3880
	STA DBUFLO
	LDA #$38
	STA DBUFHI
	LDA #$8A		; Sector $8A
	STA DAUX1
	JSR SIOV		; do it.

	JMP $38DF		; Finish and back to Attract mode.
Spending some time in the debugger, we find the attract mode at $38DF, and we find a jump to location $0506 in sector 1 where we can place our additional code. So we assemble the above routine into a bin file (headerless), and write the following bit of C code to inject the code into the unused portion of the disk sector, where it can be called after the game is loaded:
/** * Patch Baja Buggies to add score code. * @author Thomas Cherryhomes * @email thom dot cherryhomes at gmail dot com * @license gpl v. 3 */
// Patch 0x45EC to jump to our new routine fseek(afp,JUMP_POS,SEEK_SET); fwrite(&jump[0],sizeof(const char),sizeof(jump),afp);
fclose(afp);
// Done. return 0; }
Implementing a High Score Table: Kid Grid
Games like Kid Grid, PAC-MAN, Defender, Donkey Kong, and many others do not have any high score capability in them, and need to be patched. Using everything we’ve covered thus far, we’ll add a routine to deal with entering high scores to add this to Kid Grid.
We start by getting the initial game in XEX format, putting it into a form which can be disassembled, disassemble the game, add the high score routine, and assemble the result into a form which can be booted on an ATR disk, with the high score taking up the last two sectors of the disk, 719 and 720.
To get the initial game, we use the Homesoft version of Kid Grid, which can be retrieved from apps.irata.online/Atari_8-bit/Games/Homesoft/K/Kid Grid.xex, and run it directly in Altirra. This has the effect of showing the individual binary segments:
EXE: Loading program 0006-0020 to 2020-203A
EXE: Loading program 0025-0025 to 0244-0244
EXE: Loading program 002A-003B to 2300-2311
EXE: Loading program 0040-0041 to 02E2-02E3
EXE: Jumping to 2300
EXE: Loading program 0046-0270 to 2300-252A
EXE: Loading program 0275-052F to 2533-27ED
EXE: Loading program 0534-0540 to 27F3-27FF
EXE: Loading program 0545-095D to 2827-2C3F
EXE: Loading program 0962-097D to 2C46-2C61
EXE: Loading program 0982-099D to 2C6E-2C89
EXE: Loading program 09A2-09BB to 2C97-2CB0
EXE: Loading program 09C0-09DA to 2CBF-2CD9
EXE: Loading program 09DF-09F9 to 2CE7-2D01
EXE: Loading program 09FE-0A05 to 2D18-2D1F
EXE: Loading program 0A0A-0A18 to 2D64-2D72
EXE: Loading program 0A1D-0A2B to 2D8C-2D9A
EXE: Loading program 0A30-0A3F to 2DB4-2DC3
EXE: Loading program 0A44-0A53 to 2DDC-2DEB
EXE: Loading program 0A58-0A67 to 2E04-2E13
EXE: Loading program 0A6C-0A81 to 2E51-2E66
EXE: Loading program 0A86-0A87 to 2E79-2E7A
EXE: Loading program 0A8C-0A9A to 2E80-2E8E
EXE: Loading program 0A9F-0AB5 to 2EA1-2EB7
EXE: Loading program 0ABA-0AD0 to 2EC9-2EDF
EXE: Loading program 0AD5-0AEB to 2EF1-2F07
EXE: Loading program 0AF0-0B02 to 2F43-2F55
EXE: Loading program 0B07-0B15 to 2F6D-2F7B
EXE: Loading program 0B1A-0B3A to 2FB3-2FD3
EXE: Loading program 0B3F-0B95 to 3000-3056
EXE: Loading program 0B9A-0C00 to 305D-30C3
EXE: Loading program 0C05-0C6A to 30CC-3131
EXE: Loading program 0C6F-0CD6 to 3137-319E
EXE: Loading program 0CDB-1B2E to 31A4-3FF7
EXE: Loading program 1B33-1B34 to 02E2-02E3
EXE: Jumping to 2B00
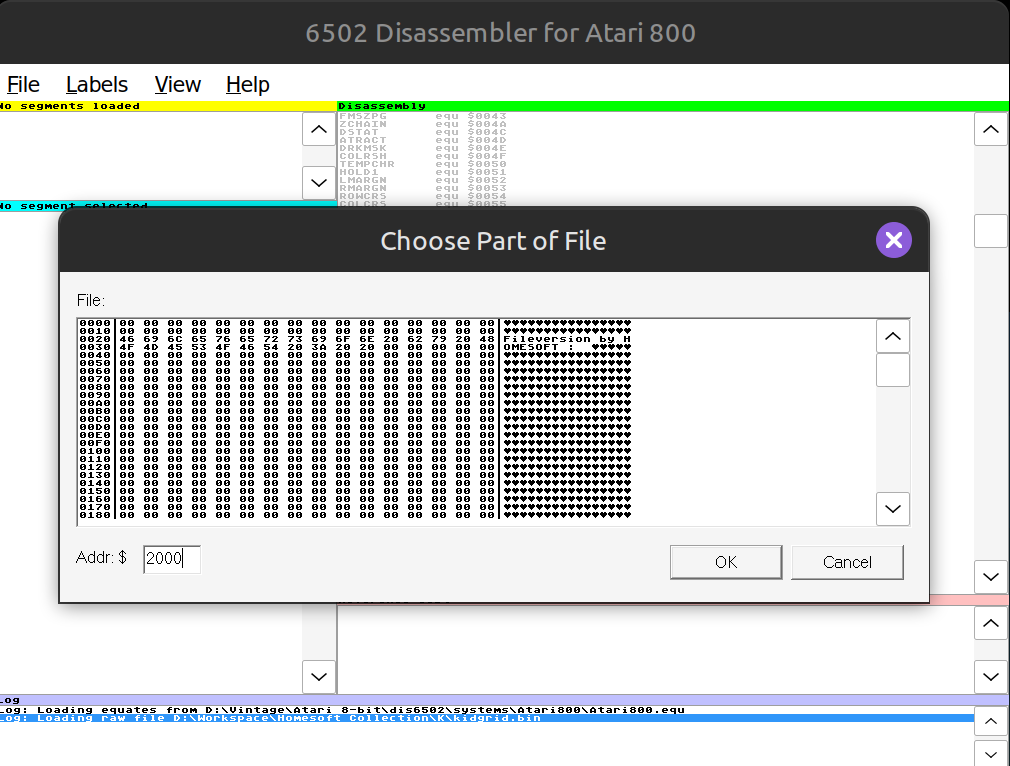
The Homesoft version does a lot of small loads (as part of its compressed format), which will get in the way of us actually patching the program, so we need to let the loader do its thing, and save the resulting memory image. Again, I use Altirra to do this:
Altirra> .writemem kidgrid.bin 2000 L2000
Wrote 2000-3FFF to kidgrid.bin
The resulting binary can be loaded into the excellent dis6502 tool as a raw binary image loaded at $2000, and the resulting disassembly saved.
We need to make two modifications to the resulting assembly, to add an ORG and a run address:
;
; Start of code
;
		org $2000
; ...
; ... at the bottom...
;

        icl "hiscore.asm"

        org $02E0
        .word $2B00
And we add a new assembly file called hiscore.asm, containing our high score routine. I will not post it here, but you can thumb through it at your leisure. It contains the routines to read and write the high score table to disk, as well as calculate if and where to place the score on the board, and read characters from the keyboard.
Note: Many games, will either completely re-vector the various routines for the SIO, vertical blank, and keyboard interrupts. These interrupts need to be restored when this routine is running, and restored back to their game values when the game resumes.
If you read the README.md for kid-grid, you’ll see that the high score was found at location $0480 in memory, stored high nibble for each digit, so the resulting data for 999999 points is:
90 90 90 90 90 90
Other README.md files in the atari-game-ports directory show what needed to be found and changed as part of the reverse engineering process for each game. Some are still a work in progress that could use some help.
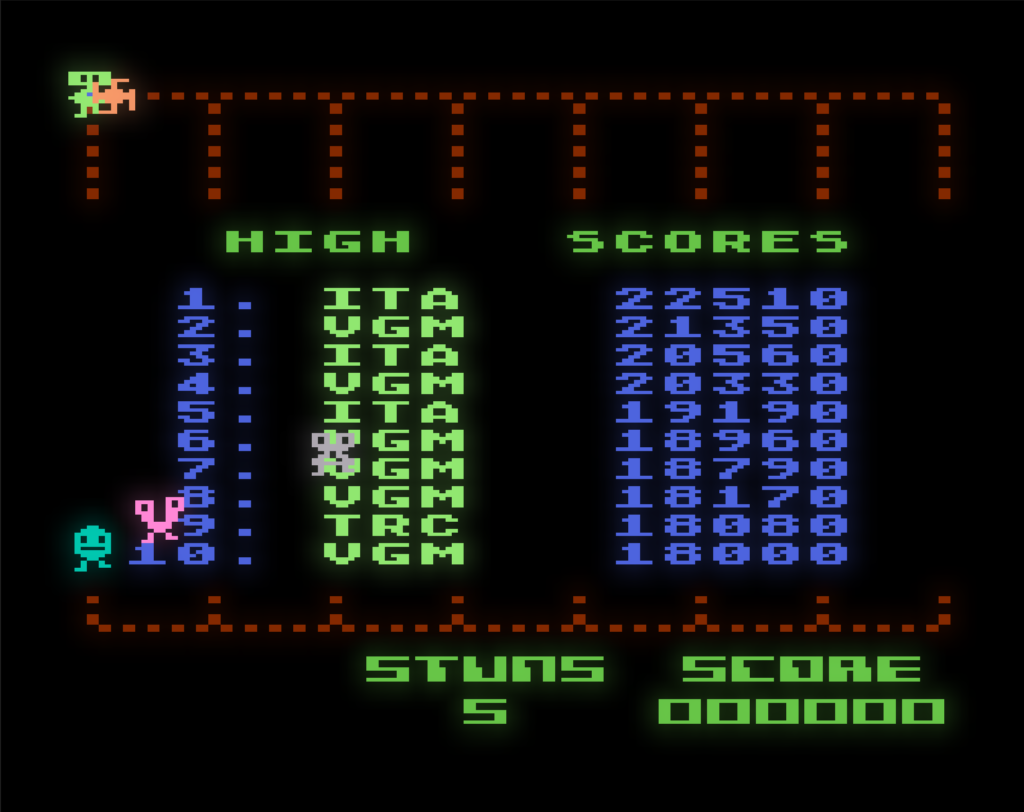
For Kid Grid, I opted to place the high score board in the middle of the screen, using mode 6 characters (20 characters per line, 4 possible colors, and one background), and an altered display list is presented to show this:
For the high score screen area, space is reserved, which is filled with the data from the two high score sectors, 719, and 720:
hiscore_txt:
	.sb '                    '
	.sb '    high   scores   '
	.sb '                    '

HISTR:	.ds 128
HISTR2: .ds 128
The actual high score table is assembled separately, without a binary header, and assembles exactly to 256 bytes, so that it can fit within two disk sectors.
;; The High score table. Will be assembled sans header ;; to be written to disk using write-high-score.c
We also need to write a small tool called write-high-score to place the above data onto the last two sectors of the disk:
/** * write-high-score - Takes <binfile> and writes to sector 720 of <atr> * * @author: Thomas Cherryhomes * @email: thom dot cherryhomes at gmail dot com * @license: gpl v. 3 */
To make this a bootable ATR, we use the dir2atr utility that’s part of Hias’ AtariSIO tools. We use this, along with a copy of picoboot.bin to create an ATR which contains the game, and a boot sector to load it. The write-high-score tool is used to then write the two high score sectors to disk, using the following Makefile:
For each of these games, the high score format is determined or created as needed, and because of this, the same data residing in each disk sector can be scraped and reformatted to be displayed as part of an HTML page. Because the scraper and the TNFS server are running on the same machine, each game’s disk image ATR can be monitored independently using the inotify system calls in Linux to detect when the disk image changes, and the resulting HTML page can be re-built.
Kid Grid’s scraper is implemented using the following C code:
/** * Grab high score from Kid Grid, write to HTML * * Linux required. (uses inotify) * * @author Thomas Cherryhomes * @email thom dot cherryhomes at gmail dot com * @license gpl v. 3 */
Since each of these services are written in C, they are not only very small in memory footprint, they have no dependencies other than needing to run on Linux, due to inotify. This can be adjusted to use the notification calls for your favorite operating system:
● kidgrid.service - Atari Kid Grid Hi-scores
     Loaded: loaded (/etc/systemd/system/kidgrid.service; enabled; preset: enabled)
     Active: active (running) since Mon 2024-12-02 00:03:48 UTC; 1 month 8 days ago
   Main PID: 1152 (kidgrid)
      Tasks: 1 (limit: 9246)
     Memory: 192.0K (peak: 1.5M)
        CPU: 5min 53.763s
     CGroup: /system.slice/kidgrid.service
             └─1152 /usr/local/sbin/kidgrid
Some Games still need help to convert.
The following games are in the atari-game-ports directory, and need help to finish their port.
Berzerk – Need to find the best place to inject where High Score Table can be triggered.
moon-patrol-redux – Needs the whole treatment.
gyruss – Needs a disassembly that is stable and can be patched well.
star-trek – Needs the whole treatment
embargo – Can’t get a stable disassembly for #@!(%$
Is there another game that needs to be here? Come help us hack on it!
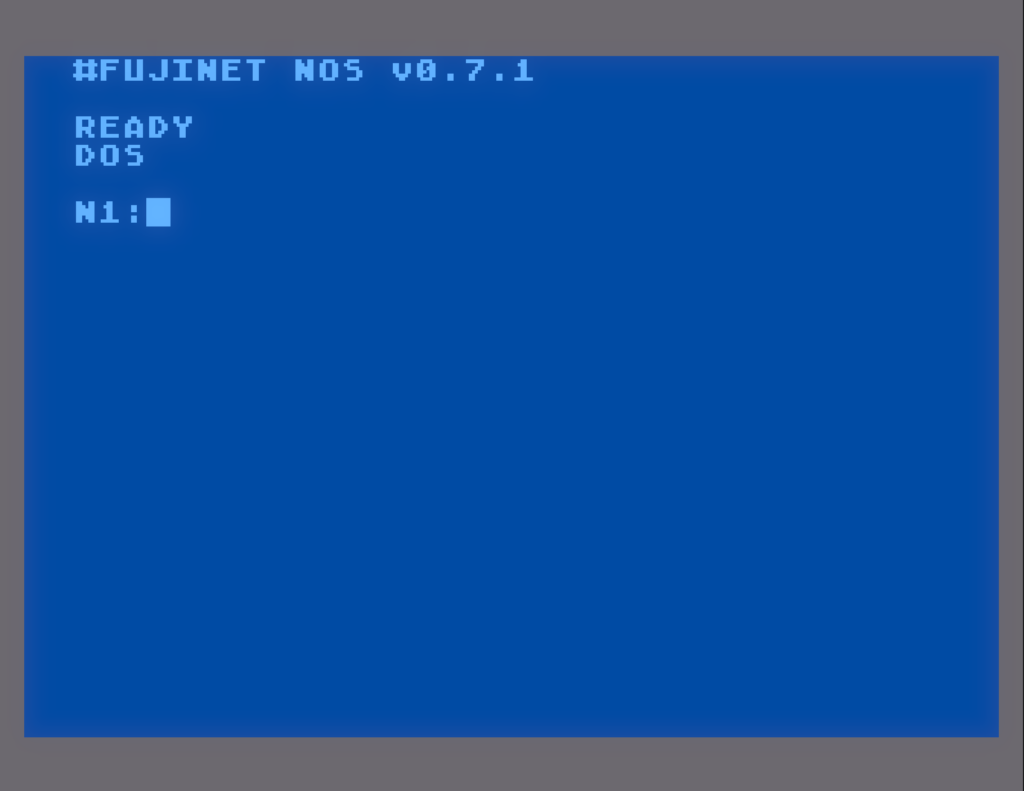
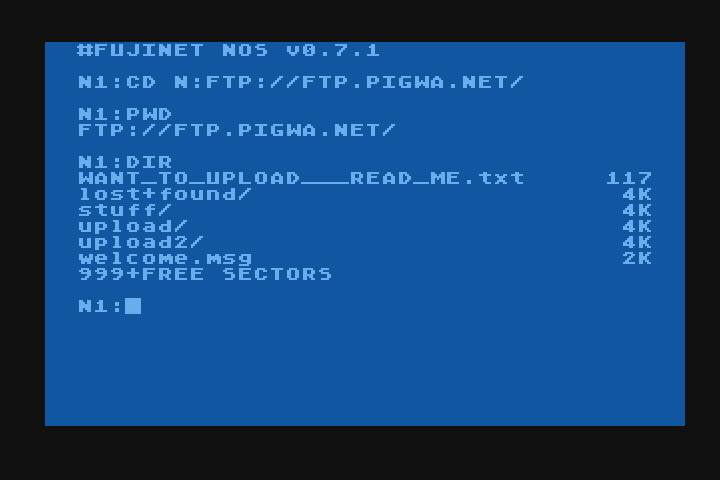
In addition to simulating existing Atari disk drives, FujiNet opens up a new possibility for Atari 8-bit users: The ability to use files stored on networked file systems directly, without needing to use a disk image file as an intermediary. The NOS is a self booting ATR which can be mounted into device slot 1 and booted in place of a typical DOS. While at version 0.7.1, it is not yet complete, it is already quite usable, thanks to the consistent efforts of Michael Sternberg, who has done a fantastic job, so far.
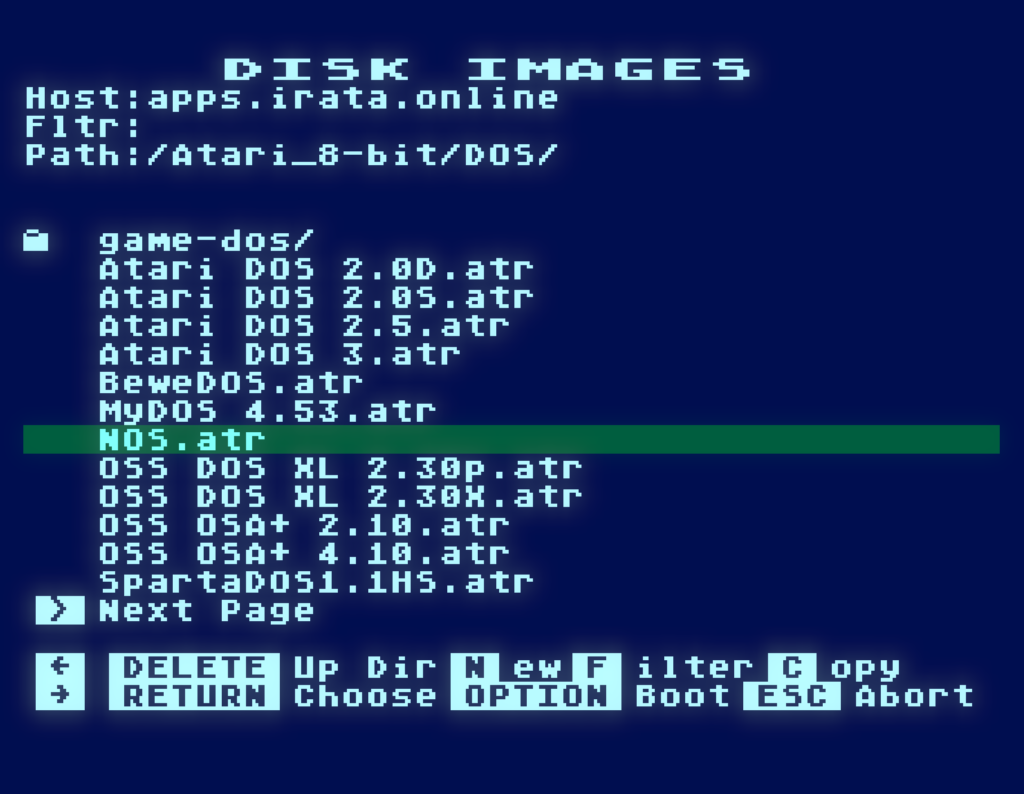
Booting NOS
A copy of NOS 0.7.1 can be found in the /Atari-8-bit/DOS/ folder of the apps.irata.online TNFS server, and mounted into device slot 1:
Once booted, you will be transferred to a cartridge, if present. The usual DOS statement in BASIC will transfer you to NOS, just like with DOS, if you do not have a cartridge installed, NOS will take control immediately, putting us on device N1 (of which there are 8 such N: devices that you can use independently):
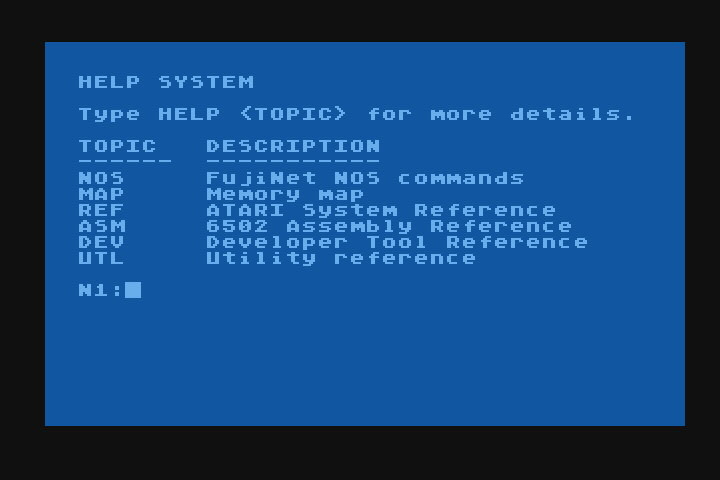
Getting Help
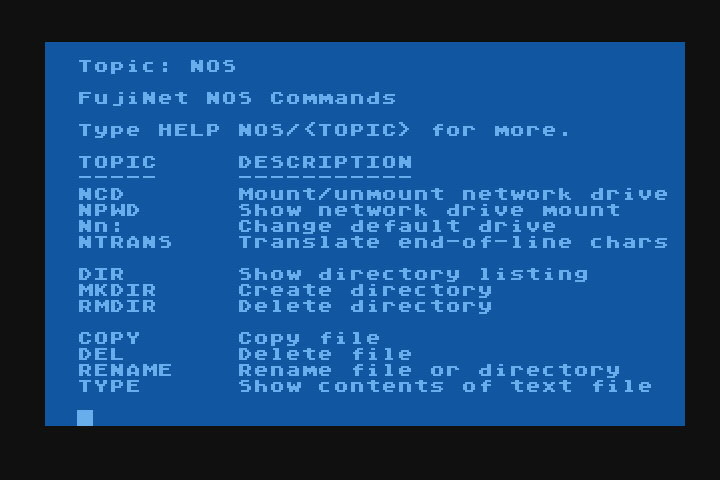
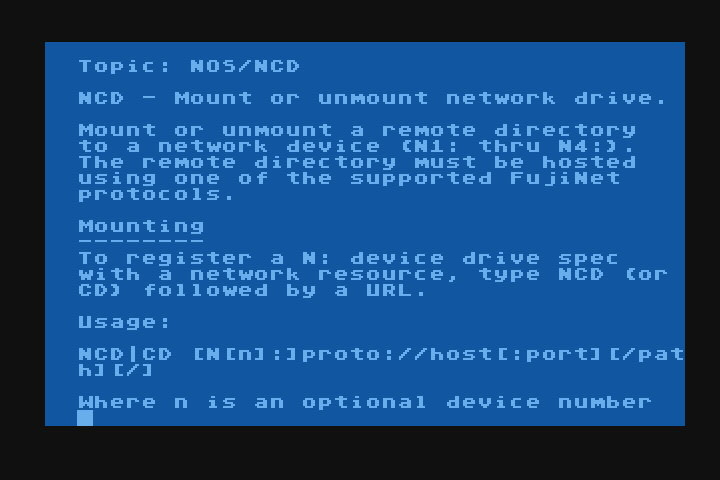
Yes. NOS is a command line DOS, in the same spirit as DOS XL, XDOS, and SpartaDOS. Thankfully, there is a comprehensive HELP system that reads its data from GitHub, just type HELP:
Each of these subsections give not only references for the built-in commands, but are also comprehensive references for software developers:
This will allow all of us as a community to add documentation for things we can add and do with NOS.
Where is the D: device?
There is no D: device. Since NOS does not load a file system of its own into memory, and relies on the FujiNet to do filesystem things, there is no D: device driver, and thus no way to access either physical drives or disk images mounted in FujiNet device slots.
Instead of providing a disk drive oriented file system, NOS provides the same N: device that is provided by NDEV in the FujiNet Network tools that are a part of every DOS disk in the Atari_8-bit/DOS/ folder on apps.irata.online.
What you can access is any individual file, over any protocol that the N: device can use. This means protocols such as:
TNFS
FTP
SMB (Windows File Sharing)
HTTP/S (Web, including WEBDAV)
SD (direct access to individual files on the SD card slot)
As a convenience, the N: device is also mapped to the D: device in HATABS, so that programs that only allow D: devicespecs can still work.
Let’s Load a Game!
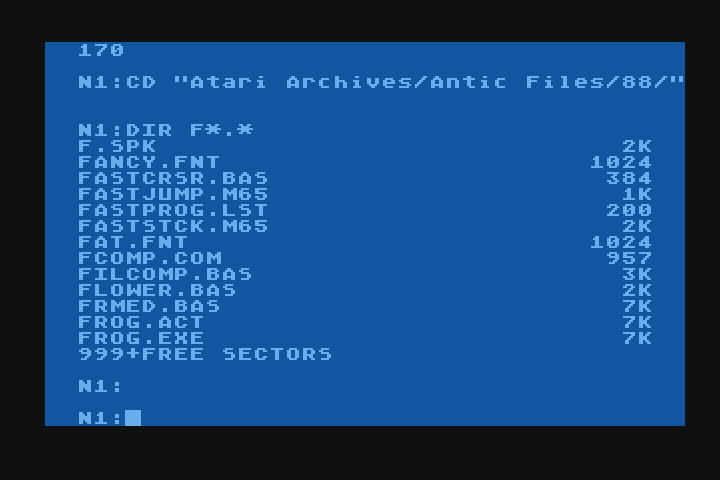
In order to demonstrate how NOS works, and what makes it different from e.g. SpartaDOS, or MyDOS, or Atari DOS, let’s load a game directly from the Pigwa FTP server. To do this, we’ll iteratively change the directory using CD, and observing where we are with DIR. Once we get to our destination, we’ll load the game.
Of course, we can indeed type this all in at once, if we wanted, or we can change the path starting at the host name:
N1:CD N:FTP://FTP.PIGWA.NET/
We can see that the path has changed, by using the PWD (aka NPWD) command. This command can be issued to see the current path:
N1:PWD
And we can use the DIR command to get a directory at this location:
N1:DIR
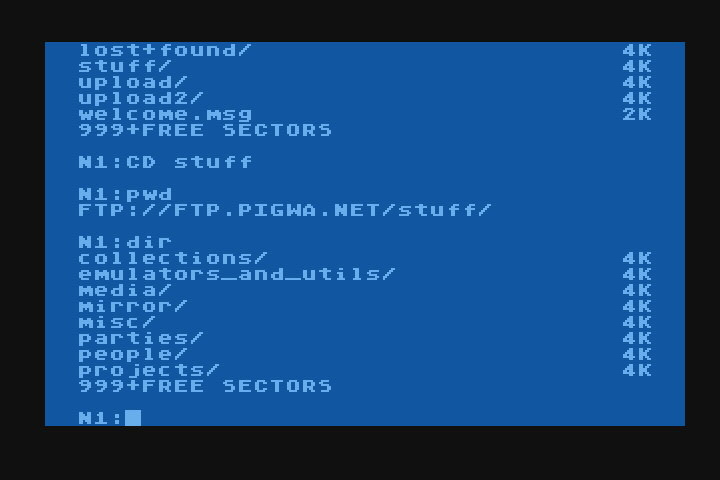
We can continue to traverse the path above, by passing the next part of the path to the CD command, and looking at the resulting directory, which we can double check with the PWD command:
N1:CD stuff
N1:PWD
N1:DIR
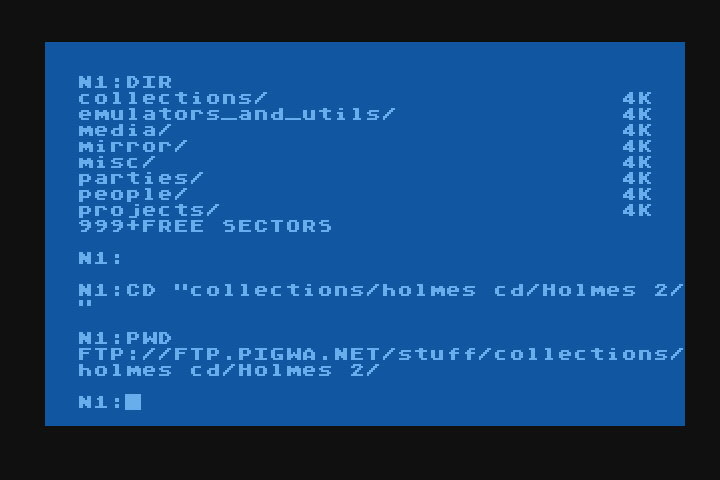
You don’t have to put each path component individually, you can concatenate path components together, seperated by a slash:
N1:CD “collections/holmes cd/Holmes 2/”
Note: Since the path contained a space, double-quotes are used to indicate that it’s all part of the path, and are only needed if the desired path contains any spaces.
You can see the result with the PWD command:
Also note: Many modern file systems are case-sensitive, and you must type names exactly as the system expects them.
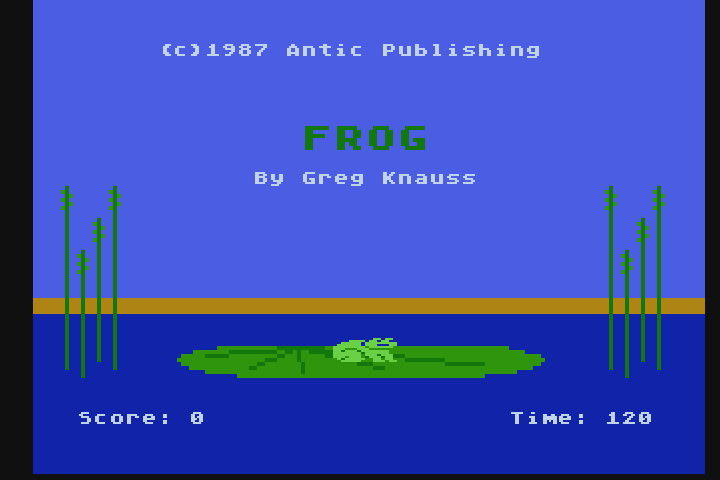
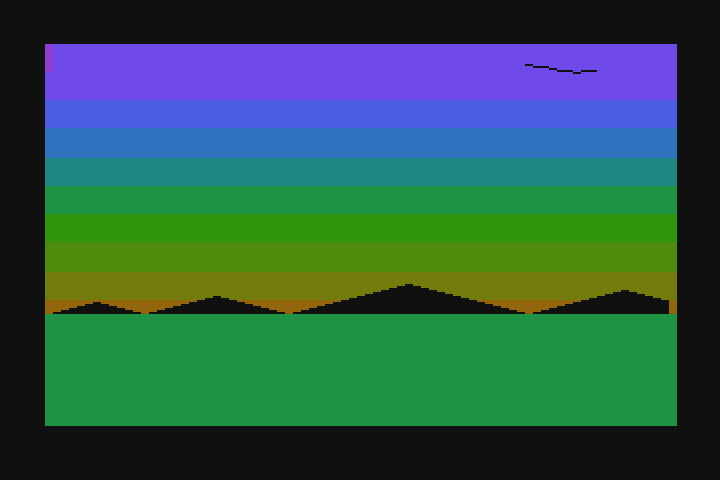
There we go. A game that was loaded directly from an FTP server, onto the Atari, courtesy of the FujiNet doing all the heavy lifting behind the scenes.
N: Works Everywhere
As a bonus, re-boot your Atari computer with BASIC inserted or enabled. If your FujiNet was powered off during this process, go back to the same path:
As has been alluded to before, there are 8 network devices defined in the FujiNet firmware, and NOS can use them all.
Note: N8: is used by NOS to handle features such as HELP.
You can change network devices in NOS by typing N1: to N8: at the prompt.
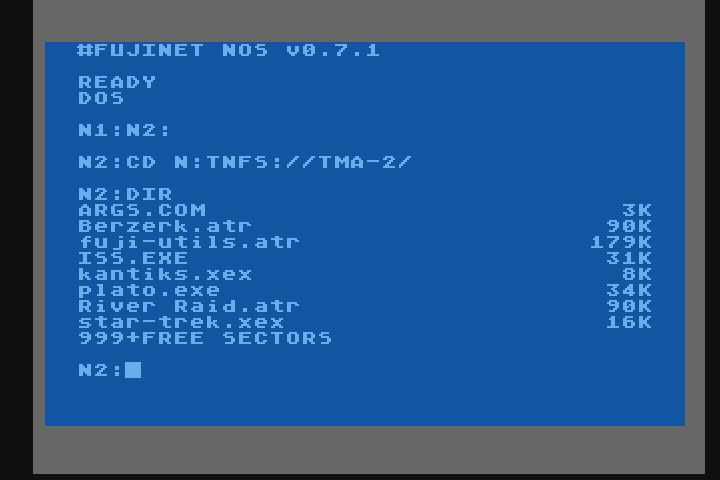
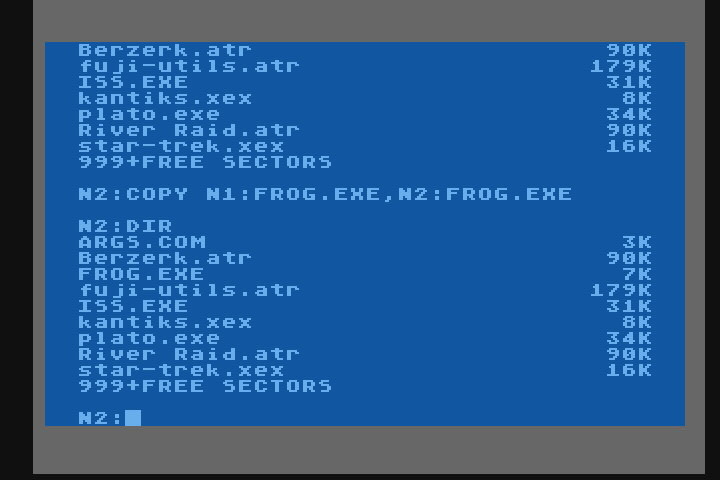
N1:N2:
The prompt will change to indicate the new default device:
N2:
This means each N: device can point to a different path:
In this case, N2: points to a local TNFS file server that I use for software development.
And I can easily copy files from one N: device to another, such as transferring the FROG.EXE we loaded earlier from FTP in N1:, onto my local TNFS file server, now in N2:
N2:COPY N1:FROG.EXE,N2:FROG.EXE
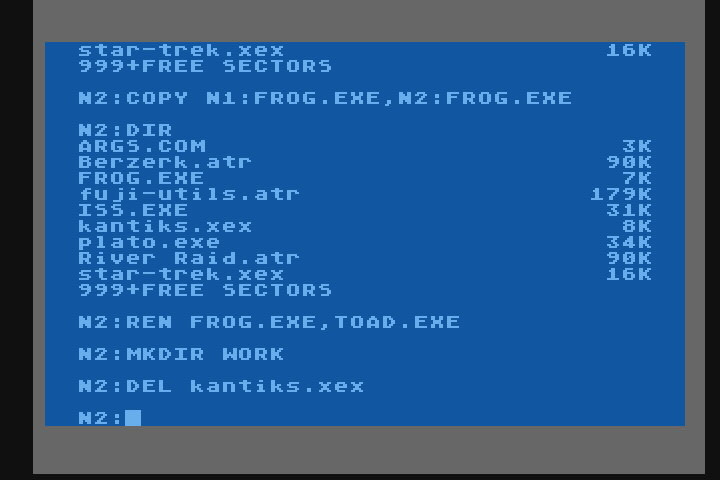
File management tasks such as renaming, deleting, as well as making and removing directories are also possible:
N2:REN FROG.EXE,TOAD.EXE
N2:MKDIR WORK
N2:DEL kantiks.xex
Automatic Boot Script
Any text file can be assigned as an automatic boot script using the AUTORUN command, giving the full path to the script:
N1:AUTORUN N:TNFS://TMA-2/AUTO.TXT
To accomplish this, NOS sets an AppKey on your FuijNet, which NOS will read when booted. This feature is useful for setting up a consistent environment with the N: devices pointed to your preferred network locations.
The Road to 1.0
While work on NOS is progressing, part of this post is a call to bring interested people in to help work on NOS and polish it up, and make it better. There are still many weird little bugs that can crop up during use, so we ask that users be patient, and if developers can help, feel free to grab a copy of the source code, and improve upon it.
The source code can be fetched from GitHub in the fujinet-nhandler repository:
And NOS is written in Assembler, using the mads assembler. The resulting build from the makefile generates the bootable ATR disk image automatically.
Thank you all for reading, I hope NOS will at the very least inspire new ways to think about how FujiNet can access networked files, unencumbered by legacy disk drive file systems, and hopefully maybe it can inspire some much needed improvements or totally new ideas in this space. -Thom
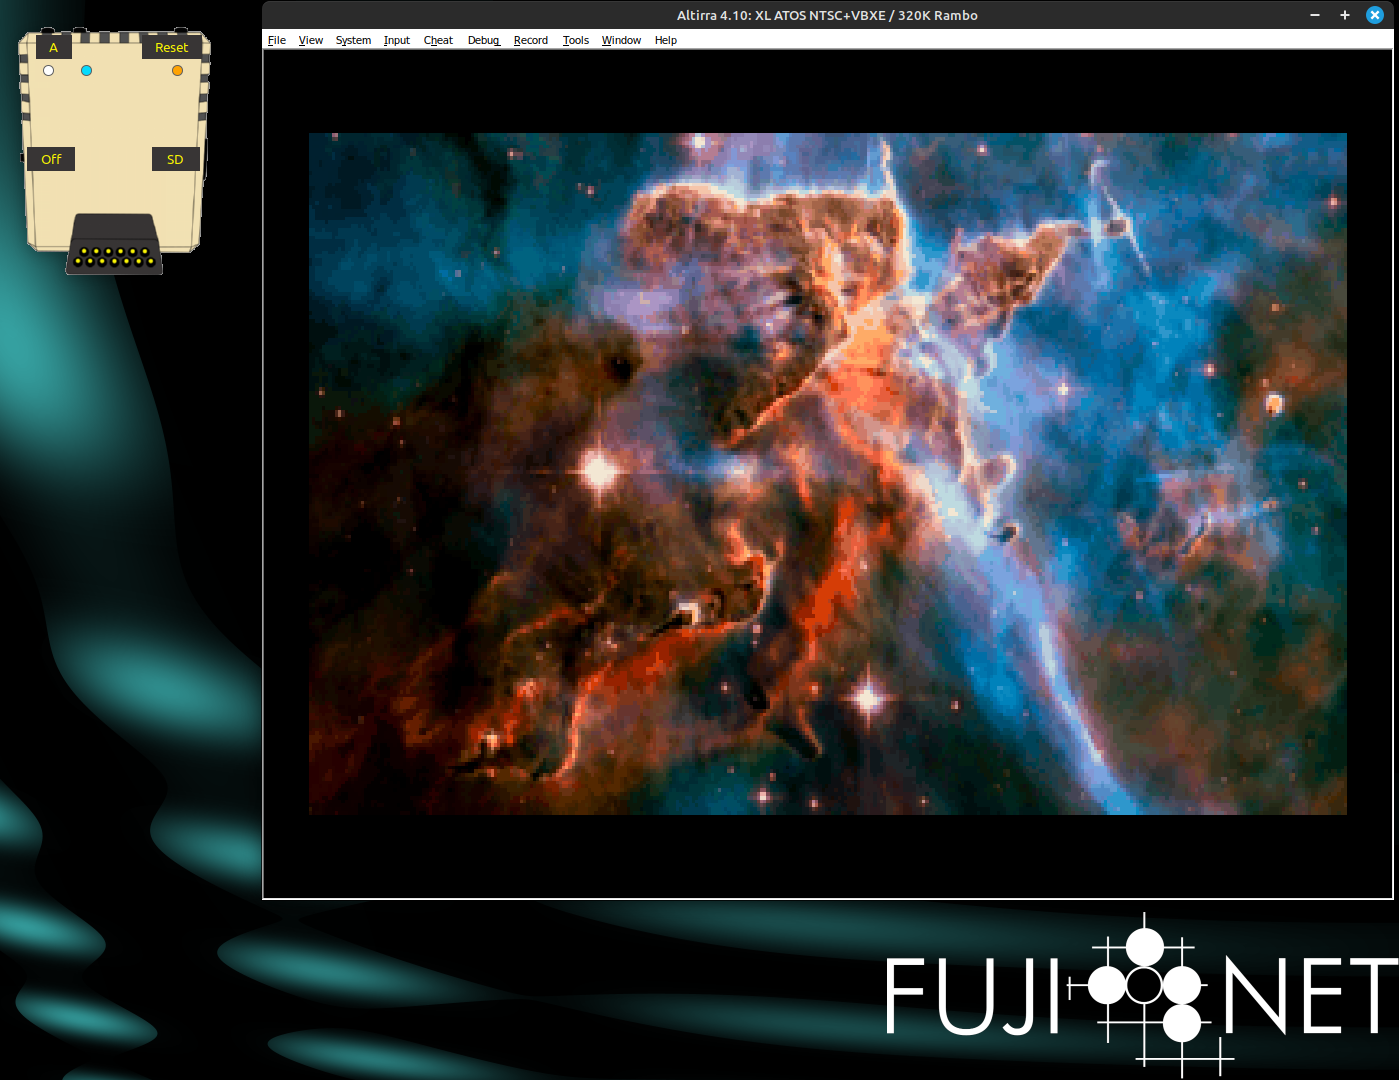
If you are not already familiar, YAIL is Yet Another Image Loader for Atari 8 Bit computers that works with FujiNet. Server software running on this website automatically converts and feeds images to the YAIL app on the Atari. All you need to do is set your graphics mode and enter a search term for the server to stream images from the internet to your Atari.
The YAIL app and YEET server were written by Brad Colbert and the source code is available on Github. YAIL can be mounted from the fujinet.online TNFS server located at ATARI/FujiNet-Apps/YAIL.XEX. For users with a VBXE upgraded Atari, you can set the graphics mode to 20 in YAIL (command: gfx 20) which enables the high resolution image streaming. Below is a demo video of the app in action.
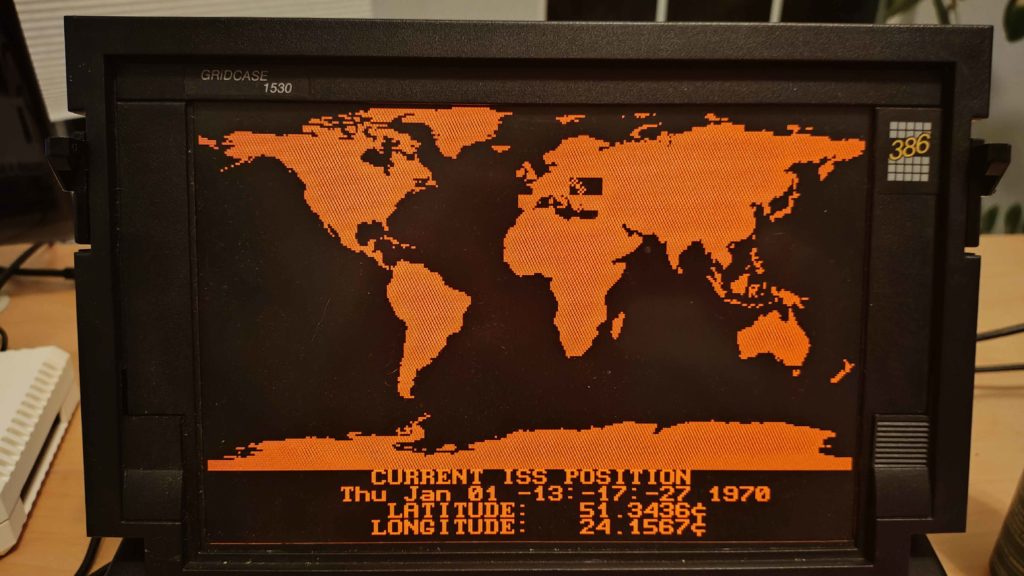
The RS-232-C version of FujiNet is starting to work. For now, the bring-up platform is MS-DOS, and specifically, my GRiDCASE 1530.
To get things running quickly, I borrowed the same protocol used by the Atari FujiNet (SIO), and adapted its control signals to RS-232-C equivalents. It is running at 9600 baud, and the firmware is working.
Using Turbo C 2.0, I quickly wrote an ISS tracker to test the network device, and I had to write a quick graphics library in the process, I refuse to use BGI. It draws in CGA, and uses the color palette and background to good effect, and looks good on both my color display and my gas plasma LCD.
While this does prove that the firmware is working as expected, the ISS program was written to directly use the serial comms routines that I put together for the RS232 FujiNet. This is not ideal, because there will be an ISA version of FujiNet for PCs, and I want them to use the same programming interface.
The MS-DOS FujiNet BIOS
To this effect, I have drawn up a specification for a BIOS that will insert itself at INT 0xF5 and 0xF6 to communicate with the FujiNet. This will allow for a standard interface to whatever versions of FujiNet end up on MS-DOS machines (including some not-so-IBM compatibles like Sanyo MBC-550, Apricot PC/Xi/Xen/Fx, Mindset, etc.)
You can read the specification here: https://github.com/FujiNetWIFI/fujinet-rs232/blob/main/fujinet-bios.md
COM.C – is the lower level interrupt driven serial port code.
FUJICOM.C – Implements the FujiNet command protocol using COM.C.
FUJITIME.C – Uses FUJICOM to send NTP commands to set MS-DOS date/time.
X1/ – The first experiment for a FujiNet BIOS, it has issues; need help.
ISS/ – Uses FUJICOM to implement the ISS tracker.
X1 is where the first FujiNet BIOS experiment is happening. It takes COM and FUJICOM and attempts to implement a BIOS dispatching interface for a couple of example commands.
TEST.COM is a DEBUG written program that sends a GET ADAPTER CONFIG command to FujiBios and tells it to place its buffer at offset 0120 in the program segment.
READY.COM is another DEBUG program written to test command 0. It’s in flux.
BIOSTEST.C and TEST3.C were C programs intended to test the BIOS call interface and debug what is happening.
When I call the BIOS functions that use FUJICOM/COM, I can transmit just fine, receiving suddenly becomes an issue, bytes don’t show up, and sometimes the FIFO just hangs with no bytes available (when there should be)
Anyone who can help, I could appreciate some eyes on this.
FujiNet had an amazing 2024. I can’t wait to see what happens for 2025.
FujiNet is not a private company. We are a public project. You can help.
We want more platforms: Commodore, BBC Micro, ZX Spectrum, Bally Astrocade, IBM PC, NEC PC-6001, and more.
Can you help with any platform you want to see FujiNet on? Join us in Discord: https://discord.gg/2Ce9guX
We want existing platforms to get ports of 5 Card Stud and Fujitzee. Want to help? Come to Discord and tap @EricCarrGH on the shoulder.
We want more games on FujiNet. Have a game idea you want to help with? Let’s meet in the #fuji-game-system on Discord.
e.g. Artillery, turn based war games, etc.
We want to bring FujiNet to Game systems, starting with the Atari 2600 and Intellivsion. Are you a game developer? Join us on Discord!
(we also want Atari Lynx developers to help get the Lynx version to a usable state!)
We want help designing a bus interface that can be used to bring FujiNet to anything with a card edge. Have RP2040/2350 experience? Come join us on the Discord!
Again: FujiNet is not a private company, we are a public project, whose goal is to bring modern and useful networking to all the Retrocomputing and Retrogaming platforms. But we need your help.
I have a saying, I have limited engineering cycles, but I make time to teach. I freely give any bit of my knowledge to anyone who stumbles into the FujiNet discord, on a variety of software and firmware subjects. Others do it for hardware. Come and learn in the discord.